Any aspiring PowerPoint ninja needs to be familiar with a subset of important features within PowerPoint. Through a series of PowerPoint Ninja “toolbox” articles, I will cover some of these key features. Whether you’re using PowerPoint 2003 or 2007, the Drawing Guide feature is very useful as you design new slides.
One of the keys to creating professional-looking PowerPoint slides is to ensure text and objects are properly organized and aligned on your slides. You can enable the Gridline feature so that the background of your slide canvas displays a gridline pattern. I find the gridlines to be a little distracting as I design slides, and I prefer the drawing guides, which can be repositioned anywhere on the slide canvas.
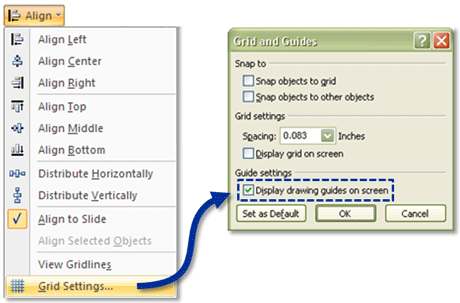
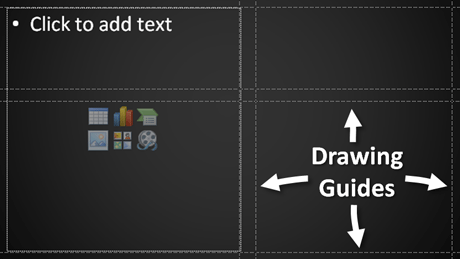
Unfortunately, this feature is a little hard to find in PowerPoint 2007, but those who are curious and persevere will be rewarded. To enable drawing guides, the simplest approach is to click on an object and then go to the Drawing / Picture Format tab on the Ribbon. Under the Arrange section of the Ribbon, you will find an Align button. When you bring up the Align menu, at the very bottom of it you will find “Grid Settings”, which opens up a pop-up window. When you check the drawing guides checkbox and click okay, a horizontal and vertical guide will appear on your slide canvas.

Under the Drawing / Picture Format Tab of the Ribbon, you will find the Align button within the Arrange section. You can enable the Drawing Guides within the Grid Settings pop-up.
The drawing guide feature is the bo staff of PowerPoint. Drawing guides can serve as useful rulers to help you align your text and clip art on any slide. In many cases, you can align objects and text using the Align feature (see left dropdown menu in the image above). However, the Align feature doesn’t always work well for unusual shapes or groups of mixed objects. In these cases, the drawing guides can be used to visually align objects.
If you’re trying to line up objects consistently across multiple slides, you can place drawing guides in specific locations to help with positioning objects on each slide. You can create multiple guides by holding the Ctrl button and dragging a drawing guide (up to 8 vertical and horizontal guides). Using this approach, drawing guides can establish a consistent layout for your slides when it is required. If you add one too many guides, simply drag it off the screen to remove it.
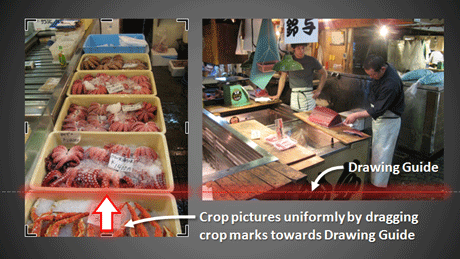
If you are re-sizing a drawing or cropping a picture, you can position the guide exactly where you want to expand or crop to, and then as you edit the item, PowerPoint will snap your editing to the guide. This design technique can be a time saver as you’re working on slides with multiple images.

Guides can be used for cropping pictures and adjusting objects.


November 19th, 2010 5:22 pm
Thanks for the articles. I’m just starting to get to know PowerPoint 2007; and finding it difficult. I was surprised to see how they hid the guide feature. But I was relieved that at least the shortcut key Alt+F9 still works to show/hide the guides! (Shift + F9 will show hide the grids.)
May 20th, 2011 2:00 pm
The guides are so useful, I don’t know why Microsoft keeps hiding them deeper and deeper with each release. Thanks for uncovering their current location.
April 19th, 2012 7:15 pm
This is HUGE! I feel so sorry for the poor people who are still struggling with manually aligning objects (just like I was 5 minutes ago)!
June 15th, 2012 1:17 am
I use this all the time and sometimes end up with 20+ drawing guides on the screen. Can they all be removed (with the exception of the two “default” guides), i.e. NOT by just switching the option off?
June 15th, 2012 10:45 am
If you select a drawing guide, you can actually delete it by just hitting the delete key.