In my previous post, I covered the useful Align features within PowerPoint. Frequently, when I use these Align options to organize shapes and images, I also use the Distribute features at the same time.
When you’re placing objects on a PowerPoint slide, you may align them properly, but that doesn’t mean they are evenly spaced. Spacing out your objects evenly is just another simple action that can keep your slides looking clean and professional. PowerPoint ninjas have zero tolerance for sloppily placed objects in their business presentations.
Distribute options

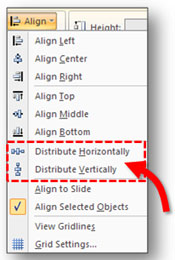
There are just two Distribute orientations — vertical or horizontal. You can find these options one of two ways. On the Home tab of the Ribbon, you can find Distribute options once you’ve clicked on the Arrange button within the Drawing section of the Ribbon. Or you can click on the Drawing Tools Format tab on the Ribbon, and the Distribute options can be found on the far right. I’ve found it handy to add these Distribute options to my Quick Access Toolbar in PowerPoint 2007.
Diagonal placement and stacking
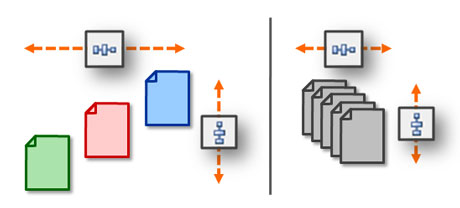
The Distribute feature is useful when you want to organize a set of objects into a diagonal line. You simply apply both of the horizontal and vertical distribute options to all of the objects. The two objects on the outer edges become the two end points for your diagonal arrangement.
You can also use this same technique to stack overlapping objects on top of each other evenly. Many times you’ll see objects stacked haphazardly on top of each other, but by using the Distribute options you can make the items evenly distributed.

On the left, objects can be arranged in a diagonal line. On the right, overlapping objects can be stacked evenly.
Be careful with grouped objects
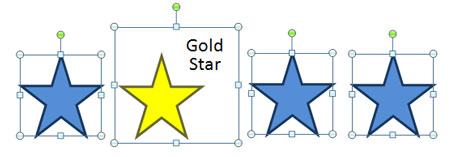
With grouped objects, you may not always be able to achieve the right spacing between the objects. Depending on the design of the grouped objects, they may include labels or other elements that are not central to the main body of the object. PowerPoint will only consider the total size of the object and not the position of the main object within the grouping. Sometimes you may need to ungroup objects before applying the Distribute features or manually space out objects instead of relying on PowerPoint’s Distribute options.

The gold star is a grouped object. The text makes the grouped object larger than the other stars. In this case, you'd need to ungroup the gold star and then apply the Distribute feature to all of the stars and then regroup the text to the gold star if necessary.


November 22nd, 2009 1:48 pm
Do you know if it’s possible to adjust the space between aligned lines?
It seems like PPT has default spacing when lines are aligned horizontally and vertically. I want to change the amount of space between the lines.
Thanks.
Michael
November 24th, 2009 1:10 am
Using the Distribute feature, I could space out parallel lines evenly. I could also distribute lines if they were in a row. Maybe I’m not understanding what you’re asking.