When you upgraded to PowerPoint 2007 from PowerPoint 2003, you might have noticed a big change in the way gradient fill effects work. When I first started using the new gradient fill effect options in PowerPoint 2007, I was a little frustrated with it. I thought that some gradient functionality had actually been removed. However, once you get oriented with the new gradient fill approach, you realize you can do what you did before with gradients and much more.
In this article, I’ll help you to reproduce the same gradient fill effects that you were familiar with in PowerPoint 2003, and then in a subsequent article I’ll highlight the new gradient options available in PowerPoint 2007.
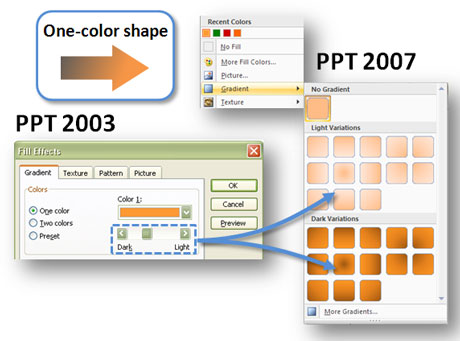
How do I add a one-color gradient effect to a shape in PowerPoint 2007?
In PowerPoint 2003, you could select one color for your shape and then have the option to create light and dark variations. In PowerPoint 2007 when you select the gradient fill, you are given quick access to two sets of light and dark variations based on the color of the shape.

To create one-color gradients, it's fairly straightforward in PPT 2007.
How do I add a two-color gradient effect to a shape in PowerPoint 2007?
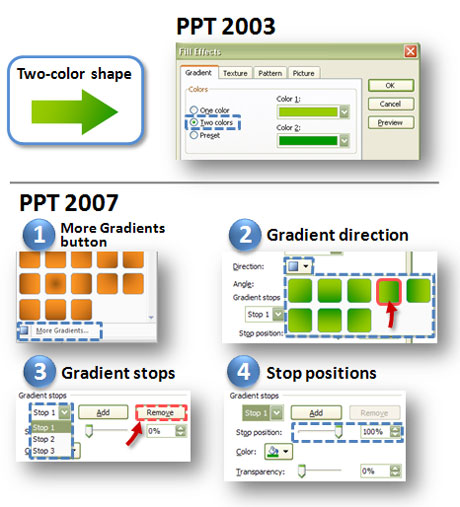
In PowerPoint 2003, you can select two colors and blend them together using a gradient effect. In PowerPoint 2007, the steps to create this effect have changed significantly. Follow these steps to blend two colors together with a gradient fill effect in PowerPoint 2007:
- More Gradients button: If you’re going to have more than one color you need to select the More Gradients button at the bottom of the initial gradient menu (see above).
- Gradient direction: You may want to verify that the direction of gradient effect is correct.
- Gradient stops: By default PowerPoint 2007 has three gradient colors or “stops”. In order to create a two-color gradient, you will need to click on any of the three “stops” and delete one using the Remove button (the minimum is two stops).
- Stop positions: You can now choose the two colors that you want and assign them to the two remaining stops. The last thing you’ll need to do is ensure that the stop positions of the two colors are set to 0% and 100%. Note: If both of the color stops have the same stop position setting (i.e., 0%/0% or 100%/100%) then the shape will appear as a solid color with no visible gradient.

Creating two-color gradient effects in PPT 2007 is a little more of a challenge as the process has changed significantly.
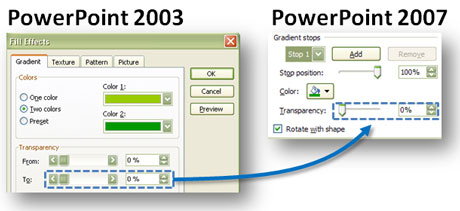
How do I make the gradients semi-transparent in PowerPoint 2007?
In PowerPoint 2003, you could adjust the transparency settings of the gradients, but it was somewhat confusing to know which transparency settings applied to which color, especially if the shape was rotated. In PowerPoint 2007, it’s actually more clear how transparency settings apply because transparency levels can be specified for each gradient stop or color.

Creating transparent gradients in PPT 2007 is now more logical.
These three sections have covered the main uses of the gradient fill and how you accomplish them in PowerPoint 2007. In my next article, I’ll cover some of the new features of the gradient fill in PowerPoint 2007.


February 24th, 2009 1:23 pm
I re-discovered gradients recently. There are 2 good ones:
1) Extreme changes between opposing colors: an arrow going from red (bad) to good (green)
2) Very, very close differences in color to add a nice tone to a background
The classical “wash-out-colors-with-grey-at-the-edges” just looks horrible.
September 26th, 2009 2:04 pm
Thanks for this article
In the last diagram, in 2003, you could specify “color 1” as well as “color 2”.
How do you specify “color 1” in 2007? As soon as I choose “gradient” in 2007, I seem to loose control of the original color!
September 26th, 2009 4:04 pm
Instead of selecting “color 1”, “color 2”, etc. like you did in PPT 2003, you first select “stop 1”, “stop 2”, etc. and then select a specific color for each “stop” in PPT 2007. In the image above, you can see the option to select the color below the “gradient stops” dropdown.
September 26th, 2009 6:01 pm
How would you get a cylinder effect from the linear gradient in PP 2007?
In 2003, I could make both sides grayish-yellow blending towards a yellow centre with a click of a button under single colour, linear gradient.
See the image link where the option is highlighted with the Magneta arrow and Circle. http://img33.imageshack.us/img33/8137/gradientsummary.jpg
September 27th, 2009 11:52 pm
Good question, PowerpointUser. The easy default option for creating a cylinder effect has been removed (hey, I thought this was an upgrade!). However, you can recreate it in PPT 2007 with a few more clicks.
First, select the right direction of the linear effect so that it flows correctly with your shape (e.g., horizontal with a flat rectangle). Then using three “stops”, adjust the colors of stop #1 and #3 so they are both gray. Then make stop #2’s color yellow. That should give you a similar cylinder effect with grayish-yellow blending towards a yellow center. Not as easy but still possible.
November 21st, 2009 10:07 pm
In 2003, you could fill an autoshape with various preset effects – for example a series of diagonal lines or a dotted pattern. Is there a way to do this in 2007?
November 24th, 2009 1:00 am
I mentioned how this was missing from PPT 2007 in this article. You have a couple of options. This feature is still available in Word 2007, but not in PPT 2007. So you could add the fill in Word, and then copy it over to PPT. You can also try this plug-in.
January 4th, 2010 3:30 pm
For 1 color gradient effects, how do you control the “transparency” of the effect? In v.2003 and in Word2007, we have the option of controling it to make it “darker” or “lighter”. From what I can see, the darkness seems to be fixed in PP2007.
January 6th, 2010 8:20 am
I didn’t notice that Word 2007 still uses the old color gradient effect options. Interesting and extremely inconsistent. The “one color” effects are actually two color effects — just different shades of the same color. You can create the color effect you want with the transparency you want in PPT 2007, it’s just going to take a little more work. You have to treat it like a two-color gradient effect.
March 1st, 2010 10:22 pm
omg, thx for this. I almost pulled my hair out trying to find how on earth to create the 2 colour gradient!!
March 16th, 2010 7:25 am
Thank you so much for this brilliantly illustrated page! I was about to lose my mind with PP 2007, I work a lot with gradients and transparencies – and the new system is not exactly clear. Brilliant, thanks!
April 23rd, 2010 4:12 pm
OK, I get all the stops and everything, but it still shows the default blue between the gradients. I tried changing the color of the shape to white first so that no color shows through, then went back in and did stop 1 at 0 and stop 2 at 100 but as soon as I click GRADIENT, it reverts back to that blue default color and it shows right through the center of my two gradients.
April 23rd, 2010 4:14 pm
What I meant to say is that as soon as I click GRADIENT, my shape becomes the default blue with a gradient applied. Even after I select my first color for stop 1 at 0 and then select a different color for stop 2 at 100, the blue still shows right down the center. I can’t get rid of the default color. Thanks for your help.
May 1st, 2010 7:11 pm
That is unusual, Mauekat. I don’t know why the blue would show up if you only have two stops and you’ve assigned different colors to them. I’d have to see the file to see what’s going on.
May 4th, 2010 10:46 pm
Thanks!
June 18th, 2010 1:36 pm
Thank you so much for this article. I was beginning to wonder if I’d ever be able to re-create my favorite gradient effects.
September 14th, 2010 2:38 am
Thanks for sharing this!
December 22nd, 2010 2:46 am
Why do only the light variations come up for darker colors?
December 23rd, 2010 2:08 pm
I don’t know. That would be a question for the PowerPoint product manager. Maybe it’s to show more contrast in the gradients.
October 3rd, 2011 7:07 pm
this helped so much! thank you
October 15th, 2011 9:05 am
2 hours of searching, clicking, undoing, cursing – and this answered IT. This is not even a MS website!
July 24th, 2013 11:20 am
This information was really helpful. Thank you so much for sharing