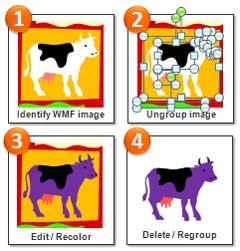
Have you ever struggled to find just the right clip art for a particular slide in a presentation? You may have searched through PowerPoint’s extensive collection of clip art images and identified some possible options. However, the clip art weren’t exactly what you had in mind due to one of the following reasons:
- Image was okay but the colors didn’t match the rest of the images or slide background
- Image was close to what you wanted but it had a few extra details in the illustration, which were unnecessary or distracting
- Image contained a useful illustration but several background elements made the clip art unusable
Within PowerPoint 2003 or 2007, you have the ability to customize most of the clip art to your liking. The following four steps will guide you through the process of tailoring clip art images to your specific needs.

To create Seth Godin's purple cow, follow these simple steps.
Step 1: Identify whether or not the clip art image can be customized
The first step is to determine if the image you would to customize is a vector-based image. The most common type of vector-based file format found in Microsoft Office is WMF (Windows MetaFile). When you hover over an image within the clip art task pane, PowerPoint will display the file format of the clip art. Any bitmap or raster image such as PNG, JPG, GIF, etc. cannot be customized or edited within PowerPoint.
Step 2: Ungroup the clip art image
Once you’ve identified a vector-based image that can be customized to your liking, you need to ungroup the clip art. Before you ungroup it, you may want to enlarge the image so you’re not editing an image that is too small. You can use two new shortcut keys in PowerPoint 2007 to group (CTRL + G) and ungroup (Shift + CTRL + G) images. When you attempt to ungroup the image, PowerPoint will display a pop-up with the following warning: “This is an imported picture, not a group. Do you want to convert it to a Microsoft Office drawing object?” Warning messages in Microsoft Office are usually not a good sign, but this one is harmless.

This warning message pops up when you try to ungroup a clip art image. It is harmless -- just click "Yes".
I recommend ungrouping the clip art in an open area of your slide so that there are not other images underneath the clip art. Otherwise, it can be hard to isolate the ungrouped objects of the clip art later on. The new Selection Pane feature in PowerPoint 2007 can come to the rescue if this accidentally happens. Depending on how the clip art was assembled and what editing needs to be done, you may need to ungroup the clip art more than once in order to get the level of detail you need for editing.
Step 3: Edit elements of clip art
Now that the image is ungrouped, you can manipulate the clip art in the following ways:
- Delete elements that are unnecessary
- Recolor aspects of the image
- Add new elements to the image
- Edit points to modify the shape of objects
Remember if you add outlines to any of the drawing objects, the outline will retain the same thickness and will not scale with the clip art if you resize it. When you’re editing a clip art image, it might be helpful to zoom in close to the image. A useful shortcut for zooming in and out while you edit clip art is CTRL + mouse wheel.
Step 4: Regroup the clip art before using
Once the clip art customization is complete, it is a good idea to regroup the image. It can then be easily repositioned, resized, or animated as needed for your business presentation.
The next time you’re feeling frustrated with your inability to find the right clip art, re-evaluate the available images more closely. See if there is a clip art image that might fit your needs with a little editing. PowerPoint ninjas do not simply accept the out-of-the-box clip art in Microsoft Office. They identify blunt objects and craft them into sharp weapons.

