Image fades can be useful in many situations (just like a good pair of jeans). (c) Thinkstock
You may have run into a situation where you wanted to fade a part of an image for a PowerPoint slide. By fade, I don’t mean the fade animation effect in PowerPoint. By fade, I mean blending the image into the background color or another solid color of your choice. You may have thought you needed Photoshop to create a fade effect with your images. However, you can achieve a fade effect directly in PowerPoint using an object with a blended transparent gradient fill.
Step 1 – Identify where a fade is required
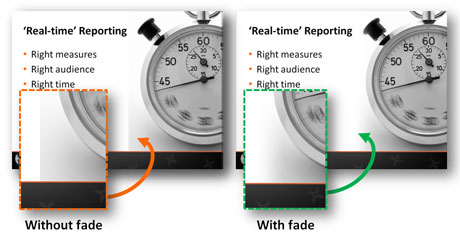
Typically, I use the image fading technique in two ways. First, you can use it to emphasize a key part of an image and still leave the audience with a sense for the bigger picture. Second, you can also use it to hide or de-emphasize less important parts of an image. In the example below, I wanted to soften or remove the edge of the image so that it didn’t stand out so much on the slide. I’ve used this approach to allow bullet points to overflow on to an image and not have the text become lost in the image.

On the left, the edge of the image stands out. On the right, using the fade technique I was able to soften the edge so the image blends into the slide better (c) Thinkstock.
Step 2 – Choose an appropriate shape and size

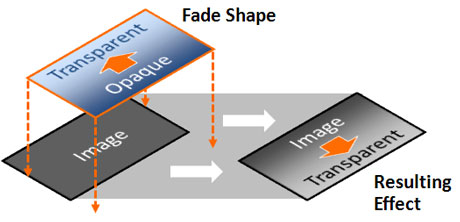
I used a long, narrow rectangle for this fade effect.
Normally, I use rectangles to fade out parts of an image (objects need to be positioned on top of images). However, you can use other shapes to create more interesting fade effects. Sizing also becomes an issue with the fade effect as a wider shape makes the fade more gradual while a narrower shape makes the fade more sharp or abrupt.
Step 3 – Add a two-stop gradient fill to shape
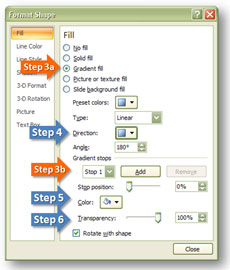
With the shape on top of the image, you right-click on the shape and click on “Format Shape” at the bottom of the pop-up menu. Under the Fill tab, you select Gradient fill. Under the Gradient stops, remove one of the stops so you only have two (by default you get three stops but the third one is unnecessary).
Step 4 – Ensure the direction of the fade is correct
While still in the Fill tab, click on the Direction and choose the appropriate orientation of the fade. For example, if you want the fade to go left to right (or vice versa), make sure you select Linear Right or Left.
Step 5 – Change stops to desired color for fade
In the Fill tab under Gradient stops, you select each stop and choose your desired color. For example, if your background is white and you want to fade an image into the background then you would select white as the color for both stops.
Step 6 – Change transparency of one stop to 100%
Next, you’ll need to adjust the transparency setting of one of the stops under the Gradient stops section to 100% (transparent). The other stop will be 0% (opaque). You may need to reverse the transparency settings of the stops depending on whether the fade flows the way you need it to.
With the image fading technique added to your toolbox, you’re better equipped to emphasize or de-emphasize key parts of images in your PowerPoint slides. This technique can add polish to your slides and help them communicate better. Good luck!


January 25th, 2011 9:49 pm
How can I create a shape in Powerpoint 2010 that uses the background fill and has a gradient transparency so that one side is fully opaque and the other side fully transparent? Is that possible?
January 26th, 2011 8:58 am
I haven’t had a chance to play with PowerPoint 2010 yet. I know, I know — some PPT Ninja. I’m probably going to use it soon so if I find an answer to your problem, I’ll let you know.
May 22nd, 2011 10:28 am
Great info, nicely done. Thank you.
April 6th, 2012 10:02 am
Good solution, but not for when you don’t have a background that has a gradient. It would be simpler if MS added a gradient/transparency function to images.
March 26th, 2014 12:34 pm
This was such a help – thank you!