Add a tapered "swoosh" arrow to your slides.
Back in December 2008, I published an article on how to create “sexy” curved arrows in PowerPoint 2007. I never thought that particular post would become one of my most popular articles. It highlights a problem within PowerPoint 2007 where you can no longer edit and curve the default arrows. The article shows you a workaround approach that enables you to create a nice flowing — dare I say “sexy” — curved arrow in PowerPoint 2007.
In this Part II article, I’d like to add to your curved arrow technique to your PowerPoint design toolbox — the curved swoosh arrow. It’s a little more work to create than the “standard” sexy curved arrow, but I think the effect might be worth the extra effort in some situations.
What are my arrow options in PowerPoint?
Before I introduce the swoosh arrow technique, I’d to review the different types of arrow options that you have in PowerPoint 2007 and show how there’s a void that the swoosh arrow fills.

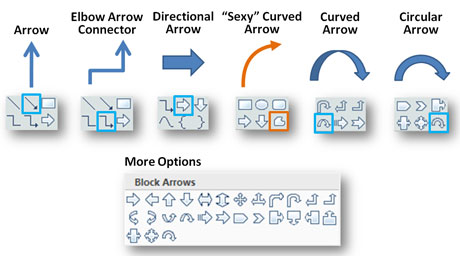
You have many arrow options in PowerPoint. However, you probably only use a handful of them regularly.
As mentioned, the default arrow is only good for straight lines — you can’t edit or curve it. Some people like to use the elbow arrow connectors. I rarely use them because I find the connectors difficult to work with and the connectors (not the objects) can’t be aligned so they often end up looking messy. You also can’t curve the connectors.
The directional (up, down, left, and right) block arrows are straightforward and very useful, and I use them frequently. However, the curved and circular block arrows usually end up looking too chunky, skewed, or generally awkward-looking so I typically just use sexy curved arrows in their place.
Enter the Swoosh Arrow

You can have fun with a swoosh arrow. Maybe I got a little too much air time on this one. (c) Shutterstock
When you look at all of the Arrow options in PowerPoint 2007, you’ll notice that all of the arrows basically have a uniform thickness. Sometimes you’d like to create a more dynamic arrow to highlight or emphasize a particular aspect of your presentation. A swoosh arrow provides a more dramatic, tapered effect than a simple curved arrow. Let’s walk through the steps to creating a curved swoosh arrow.
Step 1: Create a directional block arrow

Create a block arrow.
The first step is create a directional block arrow. The key is to size the arrow so the head of the arrow is the right size for the swoosh arrow. If you find that you haven’t sized your arrow correctly, then in most cases you’re going to have to start over so it’s important to get the arrow’s head size correct.
If you are creating a series of swoosh arrows and want them to have uniformly sized heads, you’ll want to make several duplicates of the block arrow once it is sized properly.
Step 2: Rotate the arrow to the desired angle

Rotate with the green handle.
Focusing on the arrow head, you want to make sure it is rotated to the desired entry position. It’s important to position the arrow head correctly because you want to avoid having to adjust things later on when it would be messier and more work to fix.
Step 3: Convert the arrow into a Freeform shape
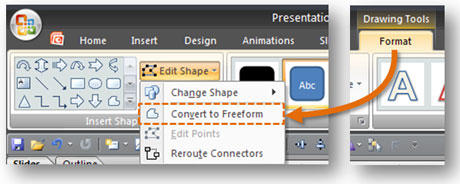
Now we need to convert the arrow into a Freeform shape so that it can be transformed into a swoosh arrow. First, you select the arrow by left-clicking on it. Second, you click on the Drawing Tools > Format tab on the Ribbon. Third, on the far left you should see the Edit Shape option within the Insert Shapes module. Click on the Edit Shape dropdown menu and select Convert to Freeform to change the arrow into an editable Freeform shape.

You could draw a curved swoosh arrow, but it's way easier to just convert a block arrow into a swoosh arrow.
Step 4: Edit the block arrow’s shape
With the arrow being a Freeform shape, we can edit its corner points to create a curved swoosh arrow. In order to edit the arrow shape, right-click on the arrow and select Edit Points. With the end points showing, you can now reposition the starting points of your arrow. You’re going to need to use the handles to adjust the angles of the corner points of the arrow to create the desired curve for the swoosh arrow. You can keep both of the starting corner points or delete one of them so the arrow starts from a single point instead.
I would recommend not touching the front three edit points that form the “V” of the arrow head. If you start playing with them you can ruin the integrity of the arrow. It will begin to fall apart like a cheap tent that has had its support poles removed.

Right-click on the arrow shape and then you'll be able to create the swoosh arrow.
Swoosh arrows may not always be worth the extra effort compared to that of regular sexy curved arrows. Most of the time a simple curved arrow will communicate just fine, and you don’t necessarily want arrows to stand out. However, when an arrow is important to what you’re trying to communicate and it needs a little extra flair or panache, the swoosh arrow can be a great option.


February 15th, 2010 8:41 pm
Great explanation. Is there a way to get to the points in a single step instead of two?
I made a screenr with your idea http://screenr.com/smx
Thanks for the instruction.
February 16th, 2010 12:38 am
As far as I can see, it can only be a two-step process (convert to Freeform/edit points). Two steps isn’t too bad, right?
January 4th, 2011 12:15 pm
Thank you. This was extremely helpful, and not published anywhere else (that I could find)
January 12th, 2011 11:22 am
Thanks for the awesome tip; very handy.
February 17th, 2011 11:02 am
I needed to create a swoosh from a rectangle to match what we had done in Adobe Illustrator. This was easier than Illustrator – and the result was just a nice. Thank you.
November 19th, 2011 5:03 am
Awesum
March 9th, 2012 6:06 am
Many thanks. i like it!!
April 16th, 2012 6:42 am
this was really helpful!
October 8th, 2012 5:49 am
two thumbs up for you. it’s awesome, very helpful!!
March 27th, 2013 4:30 am
You’re a genius and a lifesaver!!!!
April 29th, 2014 1:08 pm
How do you get the arrows to point to the left? All the curved arrows point to the right.
May 2nd, 2014 8:22 am
Sorry for the right-hand bias.