When you’re trying to highlight a key part of a chart or table, you may want to use an arrow. It’s fairly easy to create an arrow in PowerPoint 2007, but it is not as obvious how to create an eye-appealing curved arrow. I find that curved arrows are frequently better than straight arrows because they can bend around other important data points in a chart or table rather blocking them. And let’s face it — straight arrows are very boring.
How can you spot a sexy curved arrow?

You want to minimize the points in the arrow so it is more smooth
Inexperienced PowerPoint users will use straight arrows or ugly curved arrows that look hand drawn. A good curved arrow has a smooth curve – no kinks or abrupt changes in its arc. The more points in an arrow, the more bends you’ll have. The key is to minimize the points or bends (Right click on an arrow and select “Edit Points” to see how many points are in the arrow). The following steps will show you how to add more professional-looking curved arrows to your next set of PowerPoint slides.
Step 1 – Draw the arrow

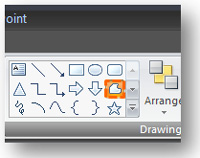
Select the Freeform shape option -- not the Arrow shape option.
In PowerPoint 2007, if you use the default “arrow” drawing option, you can only create a straight arrow. For whatever reason, you can’t edit the arrow shape so we have to use another shape which is editable — the Freeform drawing shape. Because you’re going to edit the shape once it is drawn, you don’t have to be exact on your initial drawing. Hit the “Esc” key to stop drawing the arrow once you have two points or a straight line segment.
Step 2 – Edit the points of the arrow
Now that you have a line segment drawn, right click on the line and select “Edit Points” to start adding a curve to the line. Using the blue handle that appears when you click on one of the end points, you’ll be able to change the arc of the line. You may need to play with both ends of the line to achieve the curve you’re looking for. Tip: Make sure your line doesn’t become twisted. Watch the angles of the blue handles — think “smooth” and “gradual”.
Step 3 – Add the arrow end type and width
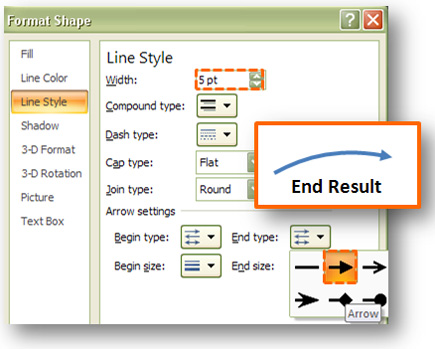
The last step is to add the arrow’s begin/end type and adjust the width of the arrow. Right click on the curved line segment and select “Format Shape” at the bottom of the pop-up menu. In the Format Shape window, go to the Line Style tab where you will be able to add an end type and change the width. Voila! You have a sexy curved arrow that will be the envy of your co-workers.

The Line Style tab will enable you to add the final touches to your curved arrow.
Since I created this post, I’ve added another article on another approach to creating a “sexy curved arrow”. Check out my follow-up Part II article.


August 18th, 2009 3:26 pm
Funky! I like it. I often use the connector arrows to create this effect.
August 21st, 2009 8:11 am
I find the connector arrows a little less flexible, and I can’t always create the effect I’m looking for. But they are an option in some cases.
September 19th, 2009 7:39 am
Thanks!
October 23rd, 2009 10:41 am
Nice..!! This is really kool, because sometimes you just want to know how to connect your things without words. So this really helps and it makes a lot of sense.
October 25th, 2009 9:38 am
[…] Texto e imágenes originales extraídos de PowerPoint Ninja. […]
January 4th, 2010 3:07 pm
Great tip! Weird that Microsoft did not include a simple curvable arrow.
February 10th, 2010 6:09 am
Just what I needed.
Keep up the good resource i’ll be checking back often now i’ve found it!
July 22nd, 2010 6:58 pm
Thanks so much! Very cool!
December 14th, 2010 12:04 am
Thanks a ton. This is very cool and easy.
April 9th, 2011 1:35 pm
Great! Thanks, thanks, thanks! – Problem solved.
June 18th, 2011 9:43 pm
Until I saw this tip (and the sequel to this article), I was hand-drawing arrows with a marker, scanning them into the PC, then recoloring and making the background transparent. Effective, but this saves MANY steps to get the same basic effect! Thanks!
June 19th, 2011 7:15 am
I’m glad my arrow tips could help you save some time.
PPT Ninja
June 29th, 2011 4:04 pm
Tremendous!…elegant and concise.
August 18th, 2011 11:19 pm
great tip!
October 9th, 2011 12:15 pm
Thanks!
But the curves made this way don’t act as connectors, at least for me. Is there a way to make connectors that have a curve? I re-arrange the diagrams a lot, and have connectors stay attached is important.
October 9th, 2011 1:17 pm
No. Unfortunately, there aren’t any curved connector options in PowerPoint.
December 26th, 2011 1:41 pm
this helped me
thx
December 27th, 2011 10:49 am
Wow…great. I don’t have much experience in creating PPT presentations but now I do know how to create amazing arrows which is just superb.
Thanks a lot!
March 27th, 2012 6:46 am
Genius!! Now my presentation looks AWESOME!
April 22nd, 2012 3:23 am
thnxxx alot!!1
May 14th, 2012 9:07 pm
There’s a way to do this for the filled arrows as well – I just ran across the following guide: http://newsalespresentation.com/powerpoint-2010-create-sexy-good-looking-arrows
May 16th, 2012 3:49 pm
I actually blogged about this approach in a Part II article to this one.
July 9th, 2012 6:26 am
It is much easier to create a curved arrow by adding an arrow end to the curved line from the basic shapes.
July 11th, 2012 8:59 am
It might be a little easier, but I don’t like the curves as much because it adds extra edit points. Even if you try to do a simple curve with the Curve tool, you get a three-point line instead of a two-point line using my method. I like the two points because I have the flexibility to create a smooth flowing curve or arc. Even just adding one extra point to the mix adds to the complexity of getting the curve just right, especially if you’re picky like me.
July 9th, 2012 3:41 pm
any way possible for Mac users? I have been searching for the “Edit Points” option but so far I can’t find it. Any help will be very appreciated.
Thanks in advance
February 27th, 2013 4:42 am
Too good! Exactly what I was looking for. My struggle for curved arrow ended here!