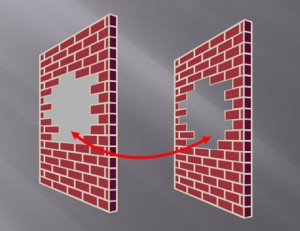
The shape on the right leverages the slide background fill effect to simulate a cut-out effect in the wall.
If you’ve ever needed to cut out a portion of an object, there’s really no easy way to do it in PowerPoint. You basically have to place another object on top of the object in question and fill it with the same color as the background. When the background is a solid color such as white or black, it isn’t a problem.
However, when your background has some kind of design or gradient, it can be hard to make a good match with the background. Many people may not realize that they have the option to fill a shape with the slide background, which can be used to create a simple cut-out effect.

Slide background fill wasn't available in PPT 2003
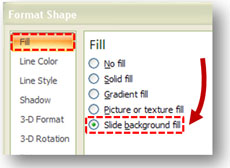
In PowerPoint 2007, you can find this option by right-clicking on the object and selecting Format Shape at the bottom of the pop-up menu. Within the Fill tab of the Format Shape pop-up window, you’ll find the Slide Background Fill option at the bottom.
Backgrounds vs. Slide Layouts

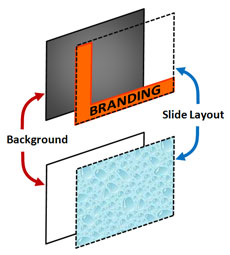
Don't confuse the background with the slide layout. Images are usually added to the slide layout layer.
When you want to use the slide background fill, you need to be aware of the difference between backgrounds and slide layouts. Although most PowerPoint users consider the slide layout (what you see in the Slide Master) to be the background, slide layouts actually sit in front or on top of backgrounds.
Depending how your corporate template is built, images or graphics can be placed in the background or slide layout layer. Most templates are constructed with the images or branding elements in the slide layout layer, which means that the slide background fill effect described above won’t work the way you expect.
You do have the ability to create a custom background on any slide by right-clicking on an open area of a slide and selecting Format Background from the bottom of the pop-up menu. Your background for that slide can be different than your overall corporate template — just be careful around your company’s branding police.


May 5th, 2009 10:19 am
I do this trick by making a blank slide (or a slide made up in whatever way I want to reveal with the cutout- the blank slide image recolored for example). I save that slide as a jpg file. Then I insert that pic and crop it down to the size of the cutout “window.” Its important to load the jpg full size over top of the slide and crop without moving it. that way the jpg looks like the portion of the slide just behind it! You can even add effects to the inserted window (frame it, recolor it etc.)
June 17th, 2009 7:32 am
Hey Zane, I tried your way and it is really good. Thanks!
August 16th, 2009 7:40 pm
Stuck with PowerPoint 2003 like me? The method shown at EllenFinkelstein.com does work, but tends to create colored edges on cut-outs that have angles or curves. This is due to edge-blending that PowerPoint imposes, creating colors that fall outside the tolerance of the Set Transparent Color tool. This can be solved by using a true bitmap editor (like MS Paint or IrfanView). The target image for your cut-out shapes must exist as a separate bitmap file (jpg, png, bmp, tif). If not, create your desired target image in PowerPoint, then right-click to Save As Picture to a PNG. Open that file with your bitmap editor. Preselect a fill color that does not exist in your image. Using the editor’s drawing tools, create solid-fill no-line shapes anywhere you desire a cutout. Save this new image under a different name and close the editor. Some editors (IrfanView), permit you to save the PNG transparent color just before saving. If so, you may click on one of your shapes now and save yourself a step later. Go back to PowerPoint and use Insert Picture to add the PNG image you just edited. If the transparent color was defined by the editor, you’re done. If not, right-click on the image to Show Picture Toolbar, then select the Set Transparent Color tool. Click on one of your cut-out shapes to make them all transparent. Voila, perfect cut-outs!
August 24th, 2009 1:28 pm
I just discovered this a few presentations ago. It made truly helped me give a more consistent effect with the graphics I was layering on top of the background. I use the “Set Transparent Color” pen and then it made clear the background of that image. Then I filled using the slide background fill. That helped a lot!
March 12th, 2010 3:43 am
Very good tip. PowerPoint is definitely getting “beefed up” as a graphics tool.
June 19th, 2011 3:37 pm
You can combine Ninja’s technique with Zane’s technique to workaround the problem. As Zane said, put your intended background on a slide and save the slide as an image file using the “Save As” command. This is your new background. Now go into your slide master and create a new blank layout. On this layout, fill the background with the saved image. Now, you can use Ninja’s technique with ANY shape (fill with slide background).
May 20th, 2014 10:03 pm
Fantastic tip