Custom animations can help you to communicate your message or idea more effectively. If you are looking to use animation to “spice up” your PowerPoint presentation, then you should look elsewhere. Animations shouldn’t be used randomly or without a real purpose. They will just distract from your message if used improperly.
PowerPoint ninjas use custom animations in situations where they are trying to control the flow of information on a particular slide and hold the audience’s attention. Animations can be great for leading an audience through a complex concept, process, problem, or solution.
In this two-part series, I’ll focus on five keys to creating effective PowerPoint animations: appropriate effects, control, timing, arrangement, and review. As we go through these different aspects of PowerPoint animations, I will refer to custom animations and effects. Custom animations are usually comprised of a series of sequential effects. You may have one or more independent custom animations on a particular slide. In this first article, I’ll cover the first two keys: appropriate effects and control.
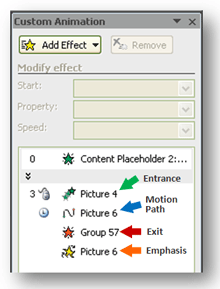
1. Appropriate effects: Just like ninjas need to choose the right weapon for a specific mission, you will need to choose the right effects for your animations. Effects fall into four categories: entrance, exit, emphasis, and motion paths. Entrance effects are the most commonly used type of effect. Within the entrance and exit categories, there are a number of shared options. For general effects, choose one type of effect (e.g., fade) and use it consistently throughout your presentation. Some of the effects are more extreme and should generally be avoided (e.g., boomerang, bounce, swivel, etc.). Some effects can be very well-suited to specific applications but not all applications. For instance, PowerPoint ninjas like to use a wipe effect on arrows and have it wipe in the same direction of the arrow. This same effect may be annoying if you used it for all your bullet points. Fewer people use the exit effects, but they can be very useful in certain situations. For example, rather than having multiple objects appear on a slide, it might be better to have a large rectangle simply fade away to reveal the objects behind it. Both emphasis and motion paths effects have limited applications and should be used only in specific cases that make sense.
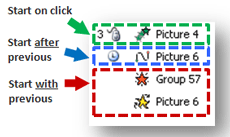
2. Control: When you set up an effect for text or objects, you have three options: start on click (mouse icon), start with previous (no icon), and start after previous (clock icon). Usually, most people just rely on the default setting of “start on click” for all effects. You will want to save the “start on click” for key stop points where you want to get across a specific point. It gives you a chance to get the audience back in synch with you before you proceed to the next effect. “Start after previous” adds a delay to your animation sequence and is useful when you want to keep the sequence flowing while you talk and avoid unnecessary hard stops (i.e., start on click). Many times I’ve seen cases where presenters are interrupted or distracted by having to click through each effect in their animation sequence. “Start with previous” is used for stacking multiple effects to run at the same time in order to maintain a good pace. A PowerPoint ninja tactic is to never initiate a slide with a “start on click” animation. A nervous presenter can forget to click when he gets to the slide and will lose his audience as they stare at a blank slide as he rambles through his notes.
In part two of this article, I will cover the remaining key tactics of timing, arrangement, and review.


July 4th, 2009 2:14 am
I’m already a convert of the “start with previous” option. Now, is there any way to make it the default option, instead of “start on click”?
July 4th, 2009 9:04 am
Unfortunately, I’m not aware of any way to adjust the default setting for animations.
March 18th, 2010 2:44 pm
I would add another to your list of 5: Print Preview. If you intend to have your presentation printed out, all objects will appear on the slide as if they have already animated. I sometimes show one object, then hide, then show another–think Pop-Up Video style callouts. I make sure that they don’t overlap in the print preview.
March 20th, 2010 8:28 am
Thanks for your comment, Lori. Printing out animated slides can be problematic. They can make no sense when you look at them in print preview due to layers and motion etc. I typically save another version of my presentation for printing and make sure that the slide makes sense when printed by leaving the main elements of the slide. I might need to remove some transitional elements so the printed slide makes sense.
August 20th, 2010 10:18 am
how to create water flowing effect in powerpoint?
plz let me know!!
April 4th, 2012 11:50 am
With the paragraph text, how do you fade previous points so only the current bullet/paragraph is emphasized?
April 4th, 2012 5:37 pm
After you’ve set up the bullets/paragraphs with a separate custom effect, you’ll want to right-click on one of the effects in the Animation Pane. You should see “Effect Options” in the menu that appears. Select it and then you’ll see a new pop-up menu that gives you the option to select an effect “After animation”. By default, it will be set to “Don’t Dim”. Change the color to a light gray (or whatever color you want) and the previous points will fade away when you click on the next point. Rinse and repeat for all your points.
(BTW – I couldn’t get the new Animation Painter in PPT 2010 to format the other points with the same effect – LAME).
November 20th, 2012 9:19 am
Thank you, I wonder if this tutorial apply to Powper Point 2003