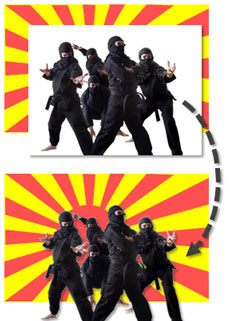
By removing the white background from an image, you can layer one image on top of another graphic.
When you’re working with picture images in PowerPoint, you may want to remove unnecessary parts of an image so that you can see other graphics behind it. If the image in question is a vector image (e.g., WMF), it may be very easy to customize the clip art image. However, if the image is a bitmap image (e.g., PNG, JPG, GIF), then you cannot simply “ungroup” the image and edit it as you want. If you own Photoshop and you’re proficient with it, this task may be fairly straightforward for you. However, many business users don’t have access to this expensive photo editing software or if they do, they may not know how to use it.
PowerPoint’s Set Color Transparent feature can be used to select a color and make it transparent. If the image has a low resolution (pixelated) or an intricate mix of colors, it can be very difficult to isolate a particular color to make it transparent. Images with a solid color background (e.g., white) can be very easy to edit and achieve a clean-looking effect.
Where can you find it?

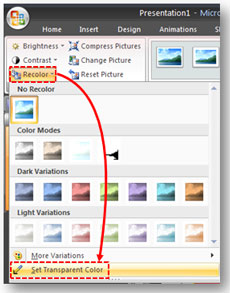
Click on the Recolor button and then find the Set Color Transparent option at the bottom of the menu.
Based on the new Ribbon navigation of PowerPoint 2007, the Set Color Transparent tool is a little harder to find than it was in PowerPoint 2003. If you’re using PowerPoint 2007, left-click on the photo image that you want to edit. Then on the far-right of the top Ribbon, select Picture Tools > Format. On the far-left of the Ribbon under the Adjust section, click on the Recolor button. At the very bottom of the subsequent menu that appears, click on the Set Color Transparent button. The pointer will then change its appearance, and you just need to click a solid color within the picture to make it transparent. If you’re using PowerPoint 2003, you can find this feature on the main menu in this manner (View > Toolbars > Picture).
What to do when the solid color is also within the main picture
Sometimes when you’re using this feature, the color you set to transparent is also within the main picture. As you can see in the example below, this can ruin the effect that you’re trying to achieve.

When we make the "white" color transparent, it impacts the main picture as well because it contains white areas.
In order to avoid this problem, you draw a Freeform shape to cover the area of the main picture that contains the transparent color. If you fill this Freeform shape with the color that was made transparent (white in this case) and set it behind the front image but in front of the background graphic, you can preserve the original look and feel of the front image.

Drawing a Freeform shape to cover the transparent areas, you can preserve the original look and feel of the main picture.


January 16th, 2009 11:38 am
Hi Brent: Just to say that I have only recently subscribed to this site. Every post makes me go ‘aha, thats how you do it!’. Keep up the great work.
January 16th, 2009 12:14 pm
The freeform shape is a great trick that I did not think about before. Thank you.
Still, I find it difficult to use the “transparent color” feature in other situations than a straight and easy white background. Even the smallest distortion at the edge of an image immediately gives away that “this designer did not invest-in/know-how-to-use Photoshop”.
If given a choice, I prefer reducing the ambition level of my artwork, rather than reducing the professional, clean, look of my slides…
Hopefully PowerPoint “14” (the next version after 2007) will provide more tools to deal with this issue.
January 17th, 2009 8:54 am
For standard corporate templates, I prefer a solid white background to avoid this distortion issue you’re referring to. Dark backgrounds usually accentuate this edge distortion. I agree that it would be nice if a PowerPoint product manager could take care of this issue in the next product release. An eye dropper tool wouldn’t hurt either…
September 2nd, 2009 4:39 am
Thankyou so much!
September 10th, 2009 10:48 am
Well. I must say, I love experimenting with powerpoint, and I would Love if you could give me new color ideas. 😉 It would help in my School Projects.
February 6th, 2010 11:58 pm
you are great buddy, as i am frequent user of powerpoint though i was not aware of it . thanks again.
May 13th, 2010 5:57 am
The free-form shape was quite clever. Thank you for sharing.
June 21st, 2010 7:36 pm
1. When I import an animated .avi that I have made, I cannot display text over it…the movie maintains it’s own space and I have to type around it…(which does not serve my purposes). Any way around this?
2. If there is no way around that, is there a way to make the background of power point itself transparent (not images brought into power point…but Power Point itself). IN other words, so I can export just text without ANY background, and then use Camastasia to record the text, without any background), so i can then merge text with .avi
(hope this was clear)
June 22nd, 2010 12:45 pm
I don’t know of a workaround in this area. I believe PPT 2010 is more friendly with video editing and playing.
With the earlier versions, you get limited options. Keynote might also be more flexible in this area based on some of the demos I’ve seen, but I’m not a Keynote Ninja (yet). Sorry I couldn’t be more helpful.
Brent.
July 17th, 2010 11:59 am
WOW YOU SAVED MY LIFE!
March 3rd, 2011 11:50 pm
THANK YOU SO MUCH! <3
I always forget how to put a partly transparent box behind my text if I can't see it properly, and I'm always looking madly all over the Internet for how to do it, and I can never seem to find what I want. At first, I thought this was only or 2007, but I was delighted to see that you told us where to find it if we're using 2003.
Thank yoooou~
March 4th, 2011 5:30 pm
I never write on blogs but I got excited cuz I was looking for this feature 😛
Thanks a lot!
May 31st, 2011 10:00 am
I scaned a document with graphics and text on parchment paper. How can I eliminate all the parchment color so I have just the details? Transparancy doesn’t work because of the varied hues. I there a way to capture just the details which by the way are solid colors.
May 31st, 2011 12:16 pm
If you’re using PPT 2007 or earlier, you don’t really have any options in the tool, and you will need to use Photoshop to make it transparent. If you’re using PowerPoint 2010, you have more options to select what parts of an image are made transparent. It’s a little tricky, but you should be able to eliminate the background parchment image and keep just the text or graphics.
PPT Ninja
June 2nd, 2011 11:08 am
Thanks for your response, but I have PPT 2007. However, I did find a FREE graphics editor called Paint.net that I downloaded and it worked great.
Using the Laso and Magic Wand tool combination I selected, changed colors and cut details. I then opened a new object, paste the cut details and cropped to get rid off wasted white space.
I saved the editing as JPG and inserted into PPT.
July 31st, 2011 7:11 am
vc fala do powerpoint 2007 mas e no 2010 onde acho base de transparencia com recolorir
January 26th, 2012 12:51 pm
So the obvious question is, how do you UNset the transparent colour?
February 2nd, 2012 10:37 pm
One of the options on the menu is to “Reset picture” which takes it back to its original format without the transparency effect.
February 27th, 2012 9:11 pm
[…] https://www.powerpointninja.com/graphics/powerpoint-color-transparency-tip/ […]
April 23rd, 2012 9:13 am
[…] Ninja (2009) PowerPoint Color Transparency Tip [WWW] Available at:https://www.powerpointninja.com/graphics/powerpoint-color-transparency-tip/. [Accessed 20 March […]
November 5th, 2012 9:40 pm
[…] Customize clip art images: […]
November 9th, 2012 10:52 am
[…] Customize clip art images: […]
April 23rd, 2013 5:11 pm
THANK YOU SO MUCH!!! WORKING ON A PRESENTATION, AND WAS TOTALLY STUMPED:-)
June 15th, 2015 11:57 pm
Thank you very much!